April 18, 2024 | Revision 1 | Authored by Bob Dabkowski
Download a PDF Version Here:
Adapted from Standard Methods for the Examination of Water and Wastewater 2710B, Ron Schuyler of COWAC, Colleen McGrath of Centennial Water & Sanitation District, Rick Fuller and others.
Introduction
The SOUR test defines what it means to be “activated” sludge. “Activated” means the microbes are hungry; they have eaten, digested and converted their food to new cells. Biologically, the term for this is endogenous respiration. For the activated sludge operator, the SOUR test informs whether the mass of microbes had sufficient time to stabilize the incoming waste and advises the relative risk of clarifier problems (settleability, ashing, clumping, high effluent TSS) from issues like denitrification. For example, if the SOUR is low enough at the end of the aeration tank, 100 mg/L nitrate as nitrogen could be in the clarifier and denitrification will not occur – because the microbes do not have enough food to perform denitrification.
The results from the SOUR test can help the activated sludge operator decide what process control decisions to perform. If the SOUR is higher than desired, perhaps the MCRT needs to be increased – increasing the mass of microbes in the reactor; or perhaps the RAS rate needs to be reduced to increase the solids residence time in the reactor; or perhaps additional reactors need to be brought online to also provide additional residence time. These actions could be reversed if the SOUR is lower than desired. No other test provides this level of detail of the actual microbes in the activated sludge process.
What is the SOUR Test?
SOUR stands for Specific Oxygen Uptake Rate, which means it measures the amount of oxygen a certain number of microbes will consume in one hour as they eat whatever food is in the sample. It is “specific” because it normalizes the oxygen consumption to one gram of microbes, so as the mixed liquor volatile suspended solids concentration changes over time, the SOUR results over that time are comparable.
The SOUR test is easy to perform, with equipment that most facilities already own. Mixed liquor is sampled from the end of the aeration tank (or mixed liquor splitter box), aerated to raise the dissolved oxygen concentration, poured into a 300mL BOD bottle, stirred, and the dissolved oxygen is measured over time with a typical laboratory “BOD style” dissolved oxygen (DO) meter and probe. The DO is recorded every minute until 15 minutes have passed, or the DO concentration reaches 1.0mg/L – whichever comes first.
The data is plotted on a chart where DO concentration is on the Y-axis and Time is on the X-axis:

The oxygen uptake rate can be calculated from this chart – find two points along the straight section of the curve and divide the change in the DO by the change in time. This calculation shows how many milligrams of oxygen were consumed each minute. To obtain the SOUR results, more data is required – specifically the mixed liquor volatile suspended solids concentration (MLVSS).
The MLVSS test is time consuming. First the sample must go through the standard gravimetric suspended solids method (in summary: weigh a filter pad, filter a certain volume of MLSS, rinse the apparatus, dry the pad at 103-105°F, weigh the pad & dried solids, calculate the milligrams of solids per liter of sample), but then the sample needs additional treatment to determine how much of it is organic, which should be mostly microbes. The best way to do this is to heat the pad to 550°F in a muffle furnace – anything organic will combust into CO2 gas and what remains on the pad are inorganic solids (clay, silt, etc. The pad needs to be weighed again and more math is performed to determine the volatile content of the sample, which can then be used to calculate the MLVSS.
Depending on how busy staff are and how well organized the laboratory is, this procedure can take anywhere from four to eight hours. The ratio of volatile suspended solids to total suspended solids in most activated sludge plants is not extremely variable day-to-day, so yesterday’s VSS/TSS ratio can be multiplied by today’s MLSS to estimate MLVSS for process control purposes.
Now all the data has been collected and SOUR can be calculated. First the OUR is multiplied by 60 to convert from minutes to hours. Second, the MLVSS is divided by 1000 to convert from milligrams per liter to grams per liter. Lastly the OUR is divided by the MLVSS to achieve SOUR in milligrams of Oxygen per hour per gram of MLVSS:
- OUR (mg O2/L/min) × 60 (min/hour) = OUR (mg O2/L/hr)
- MLVSS (mg/L) ÷ 1000 (mg/g) = MLVSS (g/L)
- OUR (mg O2/L/hr) ÷ MLVSS (g/L) = SOUR (mg O2/hr/g)
Important note: SOUR is temperature dependent. Higher temperatures will increase the SOUR, lower temperatures will decrease the SOUR. Minimize the impact of temperature error by performing the test immediately after sample collection (wait no longer than 15 minutes), using insulated sample containers (e.g. coolers) to maintain sample temperature if a large temperature differential exists, and normalizing the SOUR to a standard temperature (e.g. 20°C) if the sample temperature has extreme variability.
What does SOUR mean?
Under normal conditions, the results of the SOUR test inform the operator whether the microbes have finished or are still eating the pollutants in the water.
The consequences of microbes that are still eating are numerous: elevated effluent BOD, high effluent ammonia, denitrification in the clarifier, high effluent TSS, elevated effluent e. coli/fecal coliforms, any of which could lead to noncompliance. Therefore, it is important to interpret the SOUR results through the lens of the facility and history of the process. Is the increase in SOUR due to a higher influent load? Or is the increase due to a decrease in MLVSS? Was there a process change that can be linked to the change in SOUR? Is it a change in a good, or in a bad direction?
Each activated sludge process will have a SOUR range at the end of the aerobic process that works best for that facility. Below are ranges for common activated sludge processes, the only method to know what is ideal for your process is through experience and testing.
| PROCESS | SOUR RANGE |
| Pure Oxygen Activated Sludge | 20-50 mg O2/h/g |
| Conventional Activated Sludge | 12-20 mg O2/h/g |
| Extended Aeration Activated Sludge | 6-12 mg O2/h/g |
| Aerobic Digestion | <1-3 mg O2/h/g |
Ultimately, the SOUR test confirms that the microbes are “activated” and ready to eat. That means there are sufficient microbes in the process with sufficient time to treat the wastewater. If the operator observes any of the above consequences, and the SOUR test confirms the microbes are not “activated”, then it is up to them to look at the process holistically – for example the SOUR results, the current mean cell residency time (MCRT), the settleometer results, the solids detention time in the aeration tank, clarifier sludge blanket levels, etc – and correctly pressure the process to achieve the desired outcome.
Inhibition & Toxicity
The SOUR test can also be used to diagnose microbe inhibition and toxicity of incoming waste. Michael Gerardi1 defines these terms well: “Inhibition is a temporary, short-term (acute) or long term (chronic) loss of enzymatic activity. Toxicity is the permanent loss of enzymatic activity or irreversible damage to cellular structure.” As an activated sludge operator, the first clue of inhibition/toxicity would be rising effluent BOD or ammonia. Before making any process changes, a simple test will determine if inhibition or toxicity is occurring.
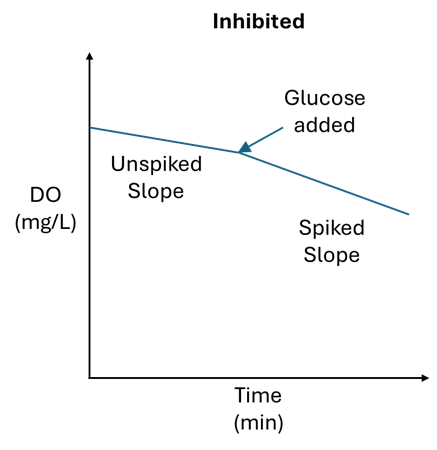
An excellent method to determine microbe inhibition is to perform a “spiked” SOUR test alongside the “normal” SOUR test. A spiked SOUR test is simple: set up like a normal SOUR test and after a few minutes add some “candy carbon” such as glucose or sucrose (table sugar) to the BOD bottle. The oxygen uptake rate will change significantly in this spiked sample if the cBOD eating microbes (heterotrophs) are uninhibited. If the oxygen uptake rate does not change much in the spiked sample, then most likely the heterotrophs are inhibited.

To determine if nitrifying organisms are inhibited, the same method can be applied as above, but instead of spiking with glucose, spike the sample with 0.1mL of household ammonia. Household ammonia has a concentration between 5-10% and should elevate the ammonia concentration in the BOD bottle to between 16 and 33 mg/L. If the oxygen uptake rate changes significantly, then the nitrifiers are likely not inhibited. If the rate does not change significantly, then the nitrifiers are inhibited and could be headed towards toxicity.
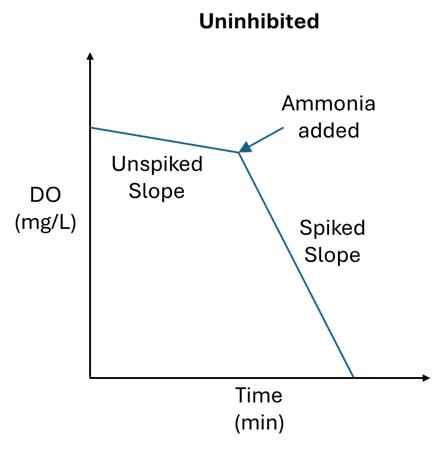
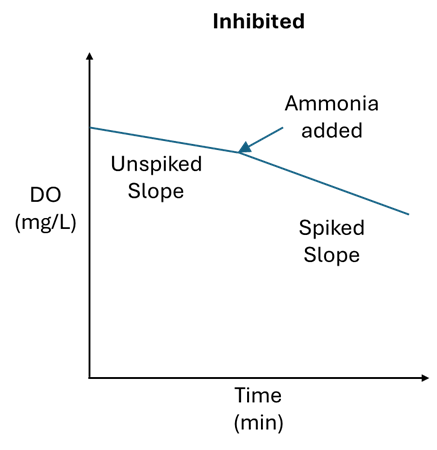
Trending both the spiked and unspiked SOUR can allow operators to detect an event early. When the spiked SOUR results drop from their normal range, this is a red flag that inhibition is occurring and may lead to toxicity.

Treatability Testing
Oxygen uptake rate can be used to test the treatability or toxicity of a waste stream to the biological process. Rick Fuller offers an excellent description of this procedure on his website, and there is no need to repeat it here: https://www.thewastewaterblog.com/single-post/2016/12/18/OUR-Level-3-Testing
Sour Method in Detail
EQUIPMENT
For Manual SOUR Calculations (e.g. Hach HQ or HQD meters)
- Volatile Suspended Solids equipment (Gravimetric TSS equipment, Muffle Furnace, etc – see Standard Methods 2540 D and 2540 E)
- Dissolved Oxygen Meter with Optical Dissolved Oxygen Probe for BOD analysis (fits in the neck of a BOD bottle, includes a stirrer)
- 300mL BOD bottle
- Timer
- Data Collection Equipment (paper, spreadsheet, LIMS, etc)
- Optional: Magnetic Stirrer and Stir Bar
- Optional: BOD bottle insulator like a koozie
For Automatic SOUR Calculations (e.g. YSI MultiLab 4010-2W or 4010-3W)
- Volatile Suspended Solids equipment (Gravimetric TSS equipment, Muffle Furnace, etc – see Standard Methods 2540 D and 2540 E)
- Dissolved Oxygen Meter with integral SOUR calculation, Optical Dissolved Oxygen Probe for BOD analysis (fits in the neck of a BOD bottle, includes a stirrer)
- 300mL BOD bottle
- Timer
- Optional: Magnetic Stirrer and Stir Bar
- Optional: BOD bottle insulator like a koozie
PROCEDURE FOR MANUAL SOUR CALCULATIONS
- Test the optical dissolved oxygen (DO) probe by exposing it to a water saturated air environment such as the headspace of a BOD bottle with ~50 to 100mL of deionized water. The displayed dissolved oxygen concentration is based on the temperature of the water and the barometric pressure/elevation of the lab above sea level – consult a saturation table such as the USGS DO Table. If the displayed value is within 10% of the expected value, proceed with the SOUR test. If the displayed value is greater than 10% of the expected value, perform the manufacturer’s suggested maintenance.
- Configure the DO meter into continuous read mode.
- Collect a sample of mixed liquor from the end of the aeration basin or mixed liquor splitter box. The sample volume needs to be at least 400mL to run both SOUR and Mixed Liquor Volatile Suspended Solids and should be collected in a plastic container with sufficient headspace and lid to aerate the sample – at least 1L. If a larger volume is desired, upsize the sample container appropriately. Tighten the lid after collection.
- Keep the sample aerobic as it is brought back to the lab by inverting the sample container. Discard the sample if the DO drops below 0.5mg/L, or if more than 15 minutes elapses between collection and running the test. If the ambient air temperature could change the sample temperature (extreme temperature difference), consider insulating the sample container.
- In the lab, aerate the sample by inverting/shaking the sample container. The amount of aeration is dependent on the sample, a dissolved oxygen of 4.0mg/L or greater is desired at the beginning of the test.
- Optional: place a stir bar into the BOD bottle for additional mixing, surround the BOD bottle with a koozie to keep it insulated.
- Fill the 300mL BOD bottle with the MLSS sample and immediately insert the BOD probe into the neck of the bottle. Turn on the BOD probe stirrer to mix the sample. Optional: place the BOD bottle with stir bar on a stir plate for additional mixing.
- Record the initial dissolved oxygen concentration, and temperature.
- If running a spiked sample for heterotrophic inhibition, after 5 minutes turn off the BOD stirrer, remove the BOD probe and add 3.0 grams of dry D-Glucose powder into the BOD bottle. Return the BOD probe and restart the mixer. Alternatively, one off-the-shelf sugar packet can be used (sucrose, 2.83g).
- If running a spiked sample for nitrifier inhibition, after 5 minutes turn off the BOD stirrer, remove the BOD probe and add 0.1mL of household ammonia into the BOD bottle. Return the BOD probe and restart the mixer.
- Record the dissolved oxygen concentration and temperature every minute until the dissolved oxygen concentration reaches 1.0 mg/L or 15 minutes pass, whichever comes first.
- Reserve the remaining sample in the sample container and have it analyzed for volatile suspended solids following Standard Methods 2540 D and 2540 E.
- Discard the used sample in the BOD bottle, wash and clean all apparatus. Store BOD probe per manufacturer’s recommendations.
CALCULATIONS
- Construct a plot of DO versus time.
- Pick two points along the straight-line section of the curve, the farther apart they are, the better.
- Subtract the lesser dissolved oxygen concentration from the higher concentration, this is the “DO Difference”.
- Determine the number of minutes between these two points by subtracting the later minutes from the earlier minutes, this is the “Time Difference”.
- Divide the “DO Difference” by the “Time Difference”, this is the Oxygen Uptake Rate (OUR) in mg O2/L/min:
- DO at Time 1 – DO at Time 2 = DO difference
- Time 2 – Time 1 = Time Difference
- DO difference/Time Difference = Oxygen Uptake Rate
- Example:
- DO at Time 1 = 5.0mg/L
- DO at Time 2 = 2.0mg/L
- Time 1 = 1 minute
- Time 2 = 10 minutes
- 5.0 – 2.0 = 3.0
- 10 – 1 = 9
- 3/9 = 0.33 mg O2/L-min
- To calculate SOUR, the mixed liquor volatile suspended solids value is required. This can be a time-consuming procedure, so yesterday’s VSS/TSS ratio can be multiplied by today’s MLSS to estimate today’s MLVSS for process control purposes.
- Multiply the OUR from step 5 by 60 minutes to convert the OUR to mg O2/L-hr.
- Divide the MLVSS concentration by 1000 to convert from mg/L to g/L.
- Divide the new OUR from step 7 by the MLVSS concentration, this is the Specific Oxygen Uptake Rate in mg O2/hr/g MLVSS:
- OUR mg O2/L-min × 60 = mg O2/L-hr
- MLVSS mg/L ÷ 1000 = MLVSS g/L(mg O2/L-hr) / (MLVSS g/L) = SOUR
- Example:
- 0.33 mg O2/L/min × 60 = 19.8 mg O2/L/hr
- 1500 mg/L MLVSS ÷ 1000 = 1.5 g/L MLVSS
- 19.8 ÷ 1.5 = 13.2 mg O2/hr/g MLVSS
PROCEDURE FOR AUTOMATIC SOUR CALCULATIONS
- Test the optical dissolved oxygen (DO) probe by exposing it to a water saturated air environment such as the headspace of a BOD bottle with ~50 to 100mL of deionized water. The displayed dissolved oxygen concentration is based on the temperature of the water and the barometric pressure/elevation of the lab above sea level – consult a saturation table such as the USGS DO Table. If the displayed value is within 10% of the expected value, proceed with the SOUR test. If the displayed value is greater than 10% of the expected value, perform the manufacturer’s suggested maintenance.
- Configure the DO meter for the SOUR method in the menu, double check the method settings and enter the MLVSS solids weight as grams per liter (g/L). Note: This can be a time-consuming procedure, so yesterday’s VSS/TSS ratio can be multiplied by today’s MLSS to estimate today’s MLVSS for process control purposes.
- Collect a sample of mixed liquor from the end of the aeration basin or mixed liquor splitter box. The sample volume needs to be at least 400mL to run both SOUR and Mixed Liquor Volatile Suspended Solids and should be collected in a plastic container with sufficient headspace and lid to aerate the sample – at least 1L. If a larger volume is desired, upsize the sample container appropriately. Tighten the lid after collection.
- Keep the sample aerobic as it is brought back to the lab by inverting the sample container. Discard the sample if the DO drops below 0.5mg/L, or if more than 15 minutes elapses between collection and running the test. If the ambient air temperature could change the sample temperature (extreme temperature difference), consider insulating the sample container.
- In the lab, aerate the sample by inverting/shaking the sample container. The amount of aeration is dependent on the sample, a dissolved oxygen of 5.0mg/L or greater is desired at the beginning of the test.
- Optional: place a stir bar into the BOD bottle for additional mixing, surround the BOD bottle with a koozie to keep it insulated.
- Fill the 300mL BOD bottle with the MLSS sample and immediately insert the BOD probe into the neck of the bottle. Turn on the BOD probe stirrer to mix the sample. Optional: place the BOD bottle with stir bar on a stir plate for additional mixing.
- Press the appropriate button on the meter to begin the measuring process (e.g. F1 for the YSI 4010-2W).
- If running a spiked sample for heterotrophic inhibition, after 5 minutes turn off the BOD stirrer, remove the BOD probe and add 3.0 grams of dry D-Glucose powder into the BOD bottle. Return the BOD probe and restart the mixer. Alternatively, one off-the-shelf sugar packet can be used (sucrose, 2.83g).
- If running a spiked sample for nitrifier inhibition, after 5 minutes turn off the BOD stirrer, remove the BOD probe and add 0.1mL of household ammonia into the BOD bottle. Return the BOD probe and restart the mixer.
- Wait for the DO meter to complete the test based upon the configured settings. The final SOUR will be displayed in mg O2/hr/g MLVSS.
- Reserve the remaining sample in the sample container and have it analyzed for volatile suspended solids following Standard Methods 2540 D and 2540 E.
- Discard the used sample in the BOD bottle, wash and clean all apparatus. Store BOD probe per manufacturer’s recommendations.
1Gerardi, M. H. (2002) Nitrification and Denitrification in the Activated Sludge Process. Wiley
